Visual chart-reading guide
Price action patterns help you describe how a market moves around earlier highs, lows and ranges. Their value starts with a clear observation: price is pausing, breaking out, pulling back or failing to continue. A pattern name alone does not tell you whether the next trade will win.
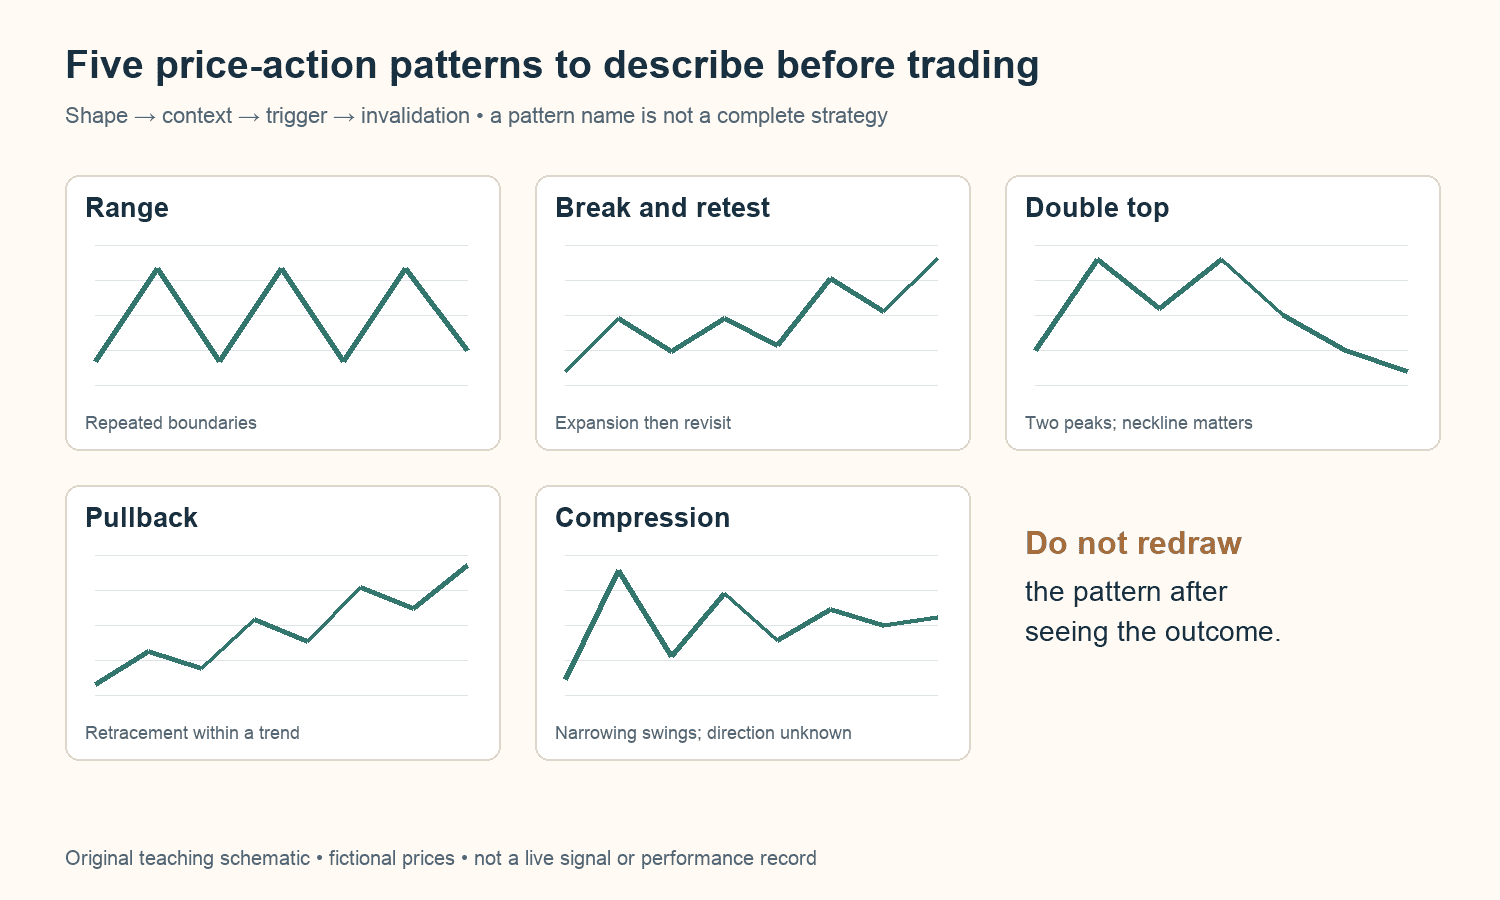
This guide connects five practical chart situations with forex, gold and Bitcoin examples. Use the original visual atlas to recognize the shapes, then work through the conditions and failure cases. All numerical examples are fictional. They explain chart-reading decisions rather than advertise historical results.
Contents
Read price action patterns in context
A small double top inside a larger rising range is not the same situation as a daily reversal after an extended move. Both may have two visible peaks, but they answer different questions. Start with the surrounding structure and the distance to nearby boundaries.
Use one consistent way of identifying swings. For example, a practice rule might require a candidate high to remain higher than the highs of two completed candles on each side. That rule confirms with a delay: the two right-hand candles must exist first. It is a learning convention, not a claim that two candles is the best setting.
Keep that delay visible when reviewing old charts. A swing label plotted back on the original high can make an entry look easier than it was in real time. Record when the swing became knowable, not just where the label eventually appears.
The CME Group continuation-pattern lesson introduces familiar formations such as rectangles, flags and triangles. The practical lesson here is to turn a recognizable shape into a reproducible observation, with boundaries and a definition of failure.
1. The range: two boundaries and an uncertain middle
A range describes repeated movement between an upper and lower area. The sketch uses roughly horizontal boundaries, but actual touches need not occur at exactly the same price. Decide whether you are drawing narrow lines or broader zones and keep the choice consistent.
In a fictional gold example, price repeatedly reacts near 3,000 above and 2,980 below. A move to 2,990 is in the middle of that twenty-dollar interval. Calling it “support” because the last candle is green ignores its location. The midpoint can offer less clear separation between the next obstacle and the point where an idea becomes invalid.
Two distinct hypotheses are possible: the range continues, or price leaves it. Do not switch between them after an unfavourable move while claiming the original plan was unchanged. A range-rejection rule and a breakout rule need separate records.
A boundary eventually failing does not mean it was incorrectly observed. It means the market moved beyond the condition you were studying. Note whether the failure was a brief wick, a completed close outside, or sustained trading beyond the area. Those are different observations.
2. Breakout and retest: distinguish departure from acceptance
A breakout occurs when price moves beyond a defined boundary under your chosen rule. A retest is a later revisit to that area. Not every breakout returns, and not every return holds. The atlas separates the initial move from the subsequent test so they are not treated as one guaranteed sequence.
Imagine a fictional EURUSD range high at 1.1000. A candle trades to 1.1004 but closes at 1.0998. Under a close-based rule, that candle has not confirmed the breakout. A later completed close at 1.1010 would satisfy the close condition, but the retest still has not happened.
If price later returns toward 1.1000, write what a hold means before watching the outcome. A close back above the level, a specified higher low or a break of a small reaction high are different rules. Each changes the entry timing and the distance to invalidation.
One common failure is a breakout followed by a close back inside the old range. Another is a valid-looking retest that never travels far enough to cover costs. Keep both in the journal. Selecting only charts with a clean departure, perfect touch and immediate continuation creates an unrealistic picture of price action patterns.
3. Double top and double bottom: the second peak is not the whole pattern
A double-top candidate has two peaks near a similar area, separated by a reaction low. The reaction low provides a reference for a completion rule. A double-bottom candidate reverses those directions. Exact equality between the two peaks or troughs is not required, but your tolerance should be stated.
The CME Group reversal-pattern lesson describes the intervening low or high as an important confirmation reference. It also emphasizes that these formations are indications, not absolute rules about the next move.
For a fictional Bitcoin example, suppose two peaks form around 60,000 with a reaction low near 59,200. The second peak alone does not establish a completed bearish reversal. Under a close-below-the-reaction-low convention, you would wait for that event before recording completion.
If price instead rises through both peaks, the candidate has failed under that interpretation. Do not erase it and show only the next successful pattern. If the two peaks are part of a broader range, label that context too. A potential double top can remain unresolved for several candles or become part of a different structure.
Head-and-shoulders patterns use a related idea with three peaks and a higher central peak; an inverse version uses three troughs with a lower central trough. Their connecting reference is commonly called the neckline. Neither an appealing silhouette nor a measured projection establishes a guaranteed target.
4. Trend pullback: a pause needs a defined trend
A pullback is a move against the direction you have identified as the prevailing trend. To use that description consistently, explain the trend rule first. Higher swing highs and higher swing lows on a stated timeframe are one possible structure-based convention.
Consider a fictional sequence that rises from 100 to 110, retraces to 106, then reaches 115. A later decline to 111 remains above the earlier reaction low at 106. That observation may be consistent with an intact rising structure, but it does not specify a buy price or prove that the decline has finished.
The continuation event also needs a rule. One learner might observe a close above the small pullback high; another might study a limit entry at a predefined area. Those methods expose the trader to different uncertainty. Record them separately instead of combining the best-looking entries from each.
A flag is a more specific way of describing a compact retracement after a directional move. A pennant uses a small converging shape. The names are useful shorthand, but a flag can deepen, a pennant can break the other way, and a pullback can become a reversal. Keep the earlier protected swing and the chosen invalidation condition visible.
5. Compression: narrowing movement does not promise direction
Compression means the observed price range is becoming narrower. In the atlas, successive highs come down while lows rise. This makes the boundaries converge. Other forms hold one side relatively flat while the other side approaches it.
When drawing the boundaries, use a consistent rule for wick extremes or closes. A line adjusted repeatedly to avoid inconvenient candles may describe the past elegantly without creating a usable forward rule. Save the first version of your drawing so you can compare it with later changes.
Imagine a fictional series whose visible range narrows from ten units to four. The smaller interval does not by itself mean a large move is imminent, nor does it establish which side will break. A news event can cause a rapid move through both sides, and a quiet market can continue drifting.
If you study compression breakouts, record the boundary before the break, the confirmation method and the treatment of a quick return. An entry that occurs after a wide breakout candle may have very different arithmetic from an entry imagined at the old boundary.
Compare five price action patterns
| Situation | First reference | Question still unanswered |
|---|---|---|
| Range | Upper and lower reaction areas | Will price reject a boundary or leave the range? |
| Breakout and retest | Boundary and completed breakout event | Will a later revisit occur and meet the hold rule? |
| Double top or bottom | Two extremes and intervening swing | Has the completion condition occurred? |
| Trend pullback | Trend rule and earlier protected swing | Will the counter-move finish or change the structure? |
| Compression | Converging boundaries | Which side, if either, will sustain a break? |
Price action patterns can overlap. A pullback may contain a small range, and that range may develop a double top. More labels do not automatically mean more independent evidence. Choose the observation that matters to the rule you are testing and avoid filling the chart with redundant rectangles.
Instrument and structureBoundary
Prices defined in advanceEvent
Completed confirmationOutcome
Failure, inactivity or follow-through
Using price action patterns across forex, gold and Bitcoin
The geometry transfers between markets more easily than the execution assumptions. A ten-unit chart movement can represent very different monetary exposure depending on the instrument and quantity. Translate the distance through the actual contract rather than using the same volume everywhere.
For forex and broker gold charts, confirm the broker feed, timezone and spread. For Bitcoin, record whether the chart represents spot, a perpetual or a CFD. A high visible on one venue may differ slightly on another, which matters when a rule depends on a narrow boundary.
Volume also needs a label. Exchange-traded volume and a broker’s tick-volume display are not interchangeable measures of total global activity. If volume is part of your method, specify exactly which series you use. Do not assume a colour bar beneath a chart proves how all market participants positioned.
Use the weekly gold outlook and weekly silver outlook for dated market context. The Bitcoin strategy walkthrough is a separate rules-based study. Context and a strategy are useful companions to a pattern, but neither removes execution uncertainty.
Practice price action patterns without seeing the answer
Choose a chart segment and hide the future candles. Write down the pattern candidate, its boundaries and the event you require next. Advance one completed candle at a time. Record a candidate that never completes as inactive rather than deleting it from the sample.
Exercise: wick or completed breakout?
Your range high is 100. A candle reaches 102 but closes at 99. Your written rule requires a close above 100. Has that rule triggered?
Reveal the answer
No. The high crossed the boundary, but the close did not. A wick-based rule might classify it differently; changing to that rule after seeing this candle would change the method.
Exercise: identify the missing information
You see two peaks at similar prices. What must you mark before evaluating this guide’s double-top completion rule?
Reveal the answer
Mark the reaction low between the peaks and state whether completion requires a close below it. Also record the timeframe and surrounding structure. Two peaks alone do not establish the completed event.
Keep a record of enough examples to expose ambiguity, but do not confuse a small learning exercise with evidence of a profitable system. Include costs, realistic information timing and unsuccessful cases before making performance claims. The aim of the first exercise is consistency: another reader should be able to follow your written rule and reach the same classification.
Price action patterns: questions beginners ask
Which price action pattern should I learn first?
Start with a range and a clearly defined breakout. They teach boundaries, completed candles and failure without requiring many labels. Move to pullbacks and reversal candidates once you can record those basics consistently.
Are candlestick patterns the same as chart patterns?
A candlestick pattern usually describes one or a few candles. A chart pattern describes a broader sequence of swings or consolidation. A candle can be part of a larger pattern, but its meaning depends on location and the chosen rule.
Do price action patterns work on every timeframe?
Similar shapes appear on many timeframes. That does not establish equal results. Costs, available liquidity, confirmation delay and the number of observations can differ substantially.
Should I trade as soon as I recognize a shape?
Recognition is only one step. A complete method still needs activation, invalidation, exit and exposure rules. If those are missing, treat the shape as a chart observation to study.
Can a pattern fail after confirmation?
Yes. Confirmation means a stated event occurred, not that the future is guaranteed. Keep failed confirmed patterns in the record alongside successful ones.
Continue with the price action learning hub. When sharing a chart in the community, include the timeframe, marked boundaries and the question you are trying to answer. That gives other readers something concrete to discuss.